
The whole help center, on one page.
Scroll through all eight sections, or use the list on the left to open one. Last reviewed 30 October 2026.
Topics
1. Find your way around
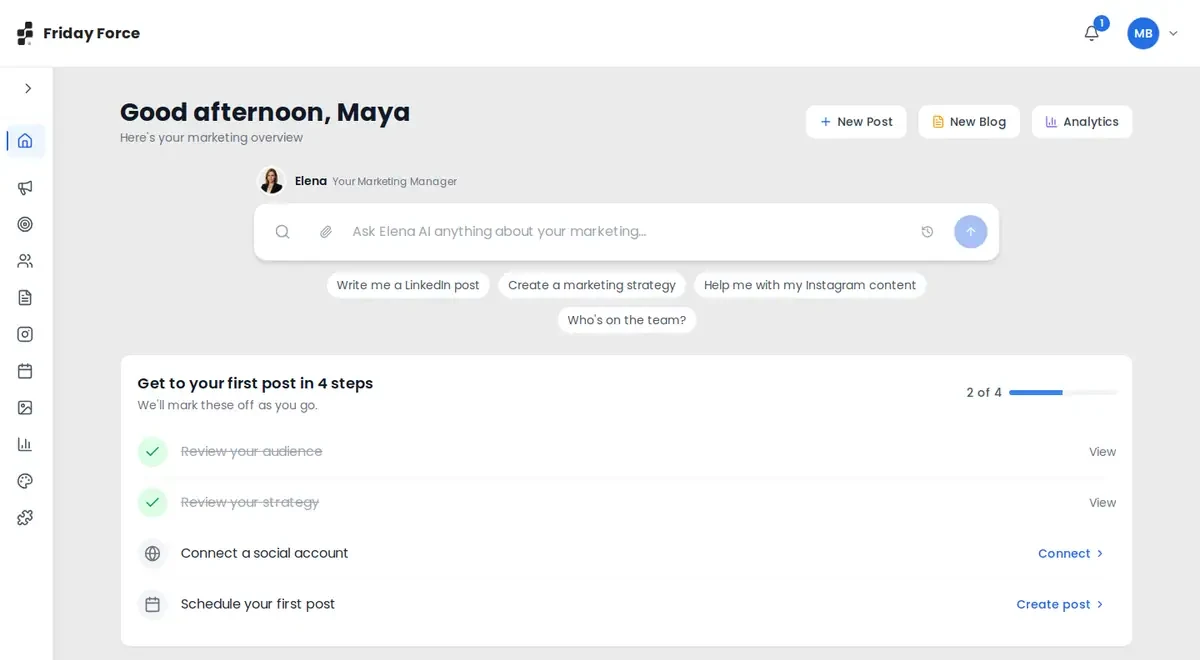
Use the menu on the left to reach every part of Friday Force. The Dashboard is home: chat with Elena, follow a short checklist, see your numbers and what is coming up. The bell shows what your team is working on.
The Dashboard
The Dashboard shows what needs your attention first.
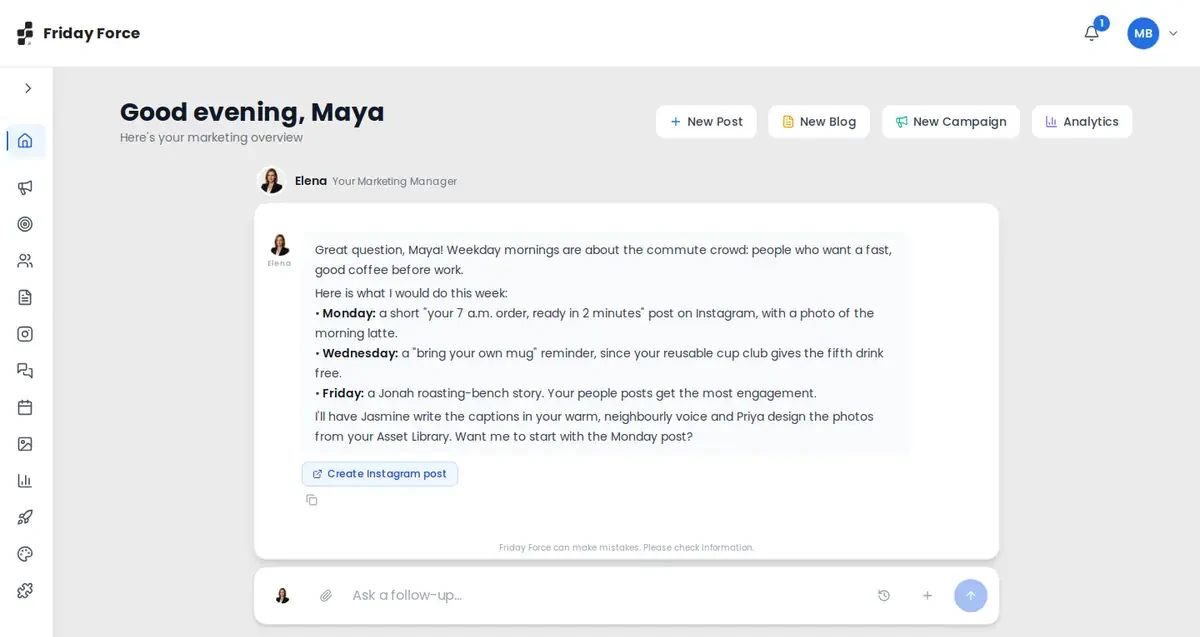
- Ask Elena: type a question or request, like “What should I post this week to get more weekday morning visitors?” She answers with a short plan (which platforms, and who on the team does what) and buttons to act on it, such as Create Instagram Post. Use the paperclip to attach files and the clock icon to reopen past chats.
- Quick buttons: New Post, New Blog and Analytics.
- Get to your first post in 4 steps: a short checklist that ticks itself off as you go.
- Your numbers: posts this month, engagement rate, and posts scheduled for the next 7 days.
- Content Pipeline: your posts by status. Check Failed here for posts that need you.
- Upcoming Schedule: the next 7 days.
Follow your team’s work
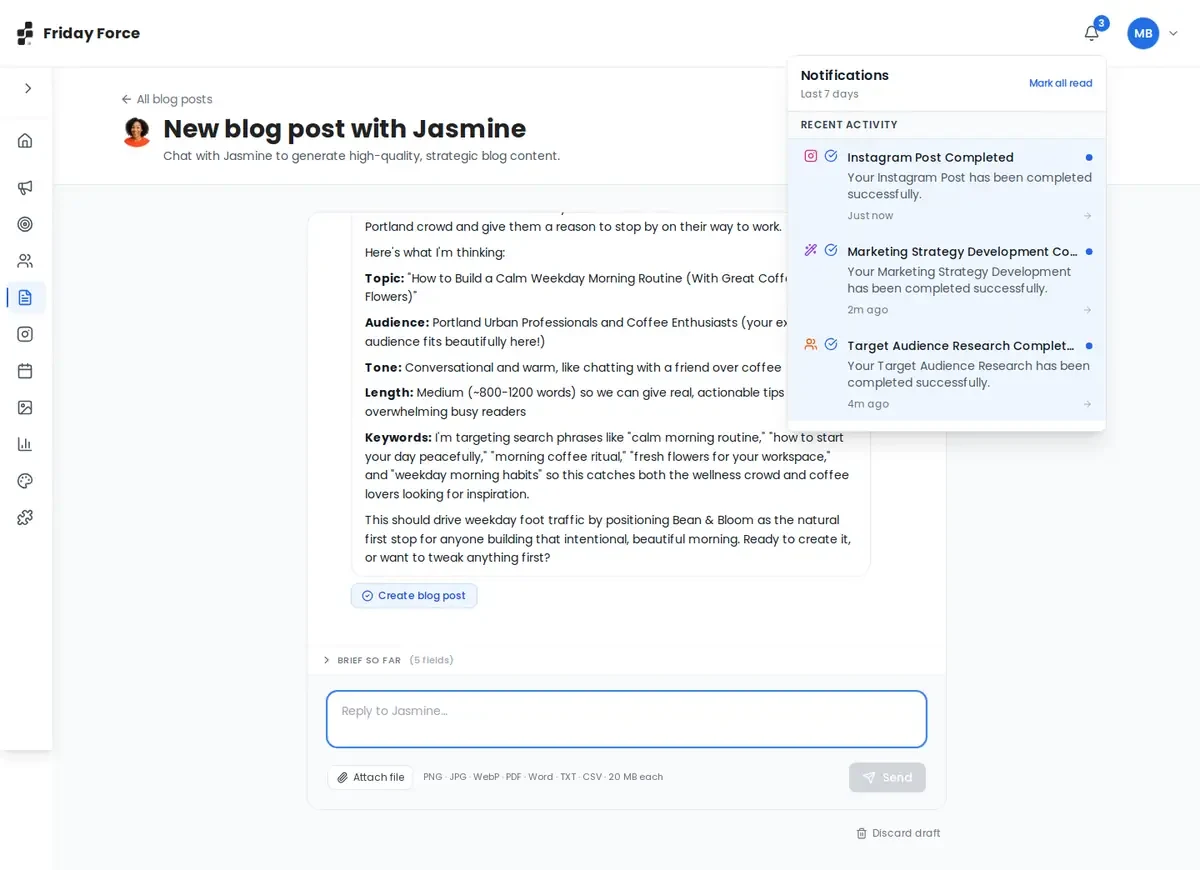
To see what your team is doing, click the bell at the top right. Active workflows shows work in progress, with a progress bar. Recent activity lists finished work, like “Instagram Post Completed”. Click an item to open it. Mark all read clears the blue dots.
Find unfinished work
- Posts: open Social Media and filter by Draft or Planned, or use the Content Pipeline on the Dashboard. Campaign posts waiting for you are under Review posts in each campaign.
- Campaigns: the Campaigns list shows each campaign’s status, for example Draft.
- Blogs: Blog Posts shows each article’s status.
Set up your profile and Brand Kit
Part of Get started: Your company profile
Covered in Get started: Confirm your company profile and Build and check your Brand Kit. Come back here for the menu and where each kind of information goes.
Where each kind of information goes
Part of Get started: Your company profile
Put information in the right place and your team uses it in every post.
| Information | Where to put it |
|---|---|
| Company facts | Organization Details: press Edit Organization, or chat with Elena |
| Background documents | Organization Details → Documents. Priya, Elena and Omar read these. |
| Logo, colours, fonts, voice | Brand Kit |
| Rules, disclaimers, banned claims | Brand Kit → Design & copy guidelines |
| Real photos (products, storefront, team, logo) | Brand Kit → Asset library. For one campaign, you can also attach them in the chat with Elena. |
| Facts for one campaign | Attach them in the campaign chat with Elena. |
If our team set up your workspace
Part of Get started: Your company profile
Sometimes Forcivate prepares part of your marketing before you sign up: a company profile, a Brand Kit, an audience or a first campaign. If that’s you:
- Sign up as usual and create your own workspace.
- Tell your Forcivate contact once you’ve signed up. We’ll copy the work we prepared into your workspace.
- Check everything we prepared. We built it from public information and our conversations with you, and you know your business best.
- Carry on from where it is. If a campaign is ready, go straight to reviewing it. You don’t need to start again.
2. Posts, blogs and creative
To make a post or a blog, tell your team what you want, then check what comes back. To change something, fix only the part that is wrong: ask Jasmine for the words, Priya for the image, or edit by hand for free.
Make a social post with AI
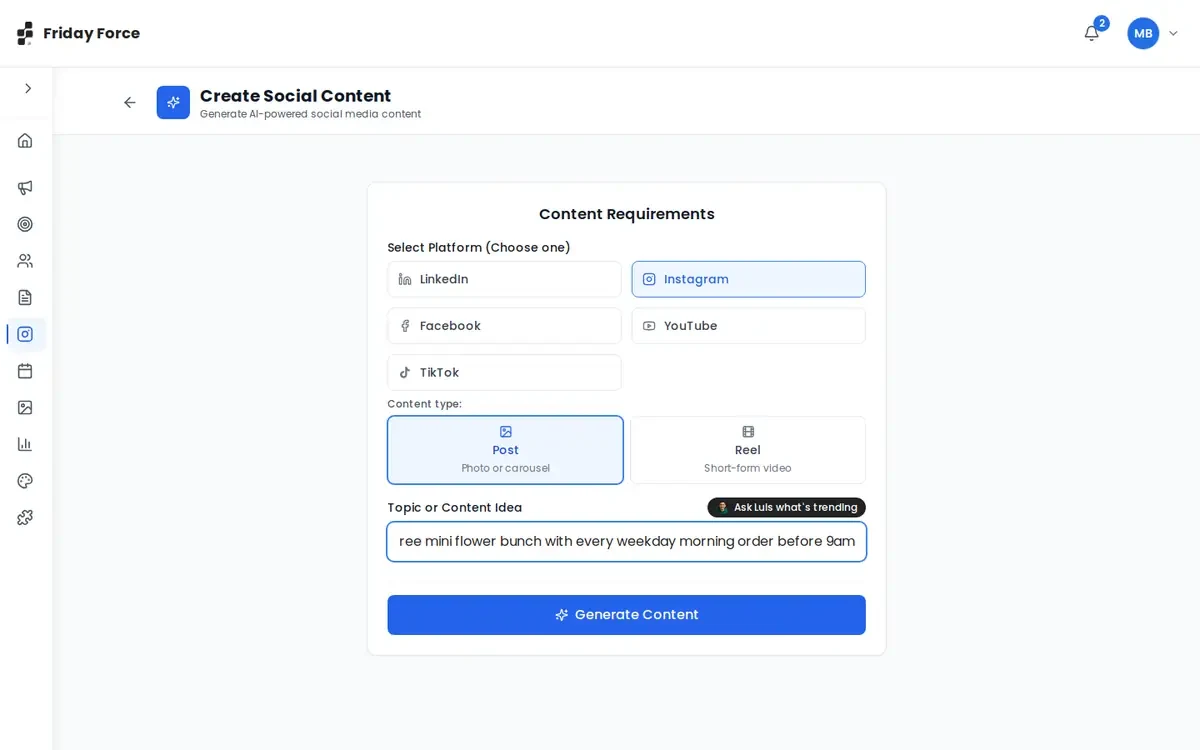
- Go to Social Media and press Create with AI.
- Pick one platform (LinkedIn, Instagram, Facebook, YouTube or TikTok) and a format. For Instagram, that’s a Post (photo or carousel) or a Reel.
- Describe your idea, with the facts it needs. Short of ideas? Press Ask Luis what’s trending, and he suggests about 5 based on your business and the platform. Picking one replaces what you typed, so pick his idea first, then add your own details in the topic box.
- Press Generate Content. The AI Team Working box shows progress. The work runs on our servers, so you can close the box or leave the page. The bell tells you when the post is ready.
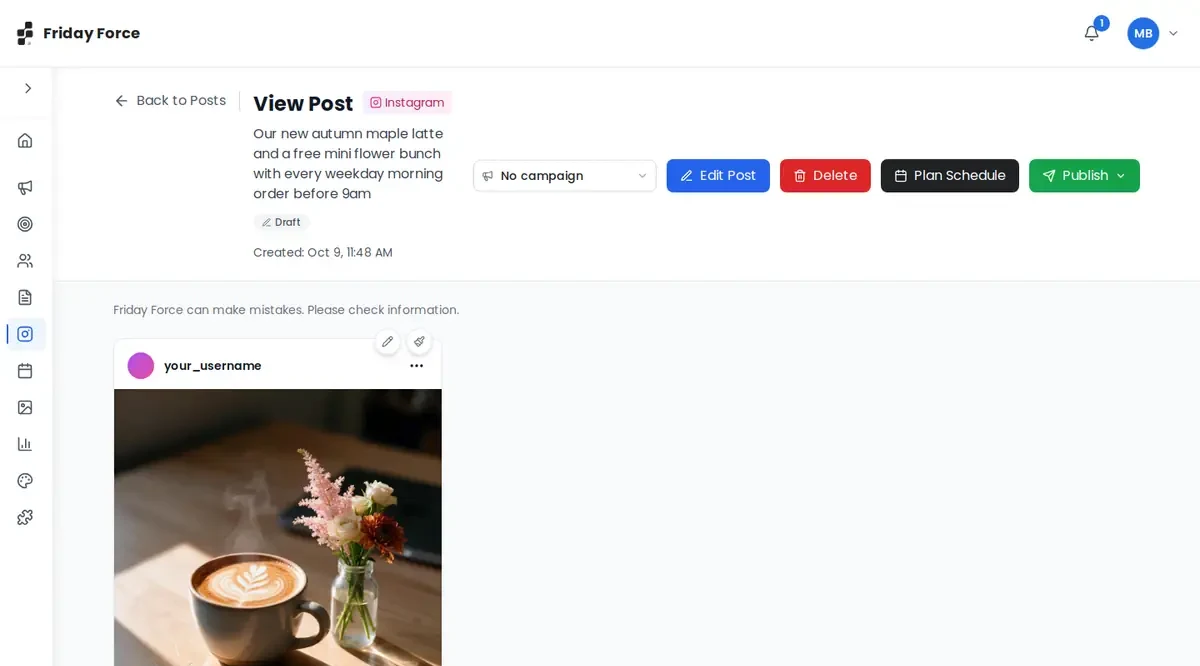
Review the post
The post opens as a preview of how it will look on the platform. Check the caption, facts, hashtags and link, and that it sounds like you. Then edit it, add it to a campaign, schedule it or publish it.
To have Jasmine rewrite the words or Priya change the image, press Consult your team at the bottom right.
Add an image or videoVideo: Pro 5x and up
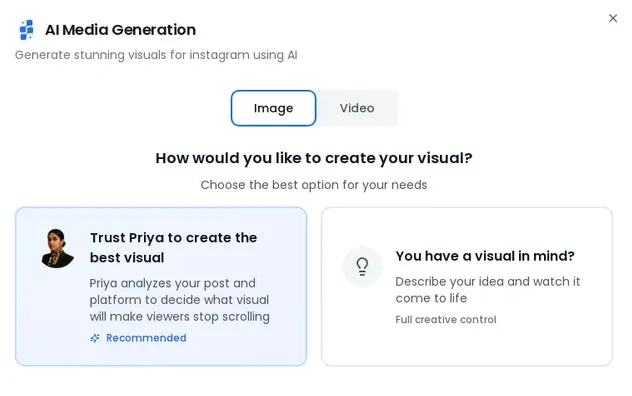
In the post’s image area, choose AI Generate or Upload Media. AI Generate makes an image or a video, and you pick how:
- Trust Priya to create the best visual: she reads your post and designs the visual.
- You have a visual in mind? Describe it yourself.
When it’s ready, press Crop to trim it or Manage to see the media.
Videos start on the Pro 5x plan. A video can run up to 30 seconds. Videos take longer and use more credits than images.
For posts about your real products, premises or people, Upload Media with your own photos is usually the safest choice.
Who to ask to change what
Part of Get started: Direct your AI team
To fix a post, change only the piece that’s wrong. You keep what’s already good. Editing by hand is free; asking a specialist uses credits.
| You want to change… | Do this |
|---|---|
| A whole campaign’s direction | Tell Elena in the campaign chat (offer, dates, channels, rhythm), or press Rebuild on the draft plan |
| One campaign post | In Review posts: Edit, Regenerate copy or Regenerate visual. Or mention @Jasmine in the campaign chat. |
| A caption | Press Edit Post and change it yourself, or use Consult your team → Jasmine. Revert undoes her change. |
| An image | Consult your team → Priya, or Upload Media with your own photo |
| A blog post | Edit the text directly, or chat with Jasmine (text) or Priya (images) on the blog |
| When a post goes out | Drag it on the Content Calendar, or use Edit Date or Plan Schedule on the post |
| Audience or strategy | Chat with Omar, or press Edit on the audience |
| Company facts | Ask Elena, or press Edit Organization |
See what things cost.
Ask the team to change a post
Part of Get started: Create your first campaign
To change a post without editing it yourself, press Consult your team at the bottom right of any post and pick who to ask. (Edit Post is always there if you’d rather do it by hand.)
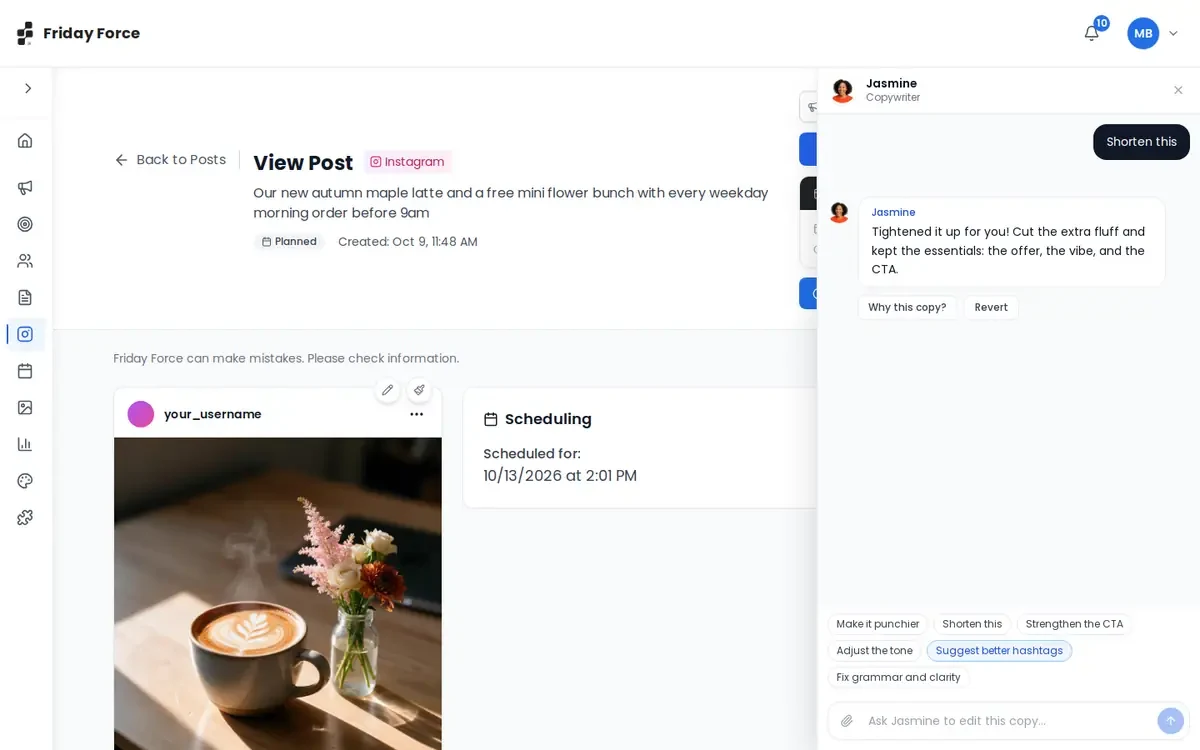
- Jasmine, Copywriter: tap a request (Make it punchier, Shorten this, Strengthen the CTA, Adjust the tone, Suggest better hashtags or Fix grammar and clarity) or type your own. She rewrites the caption on the post and tells you what she changed. Why this copy? explains her choices, and Revert puts the previous text back.
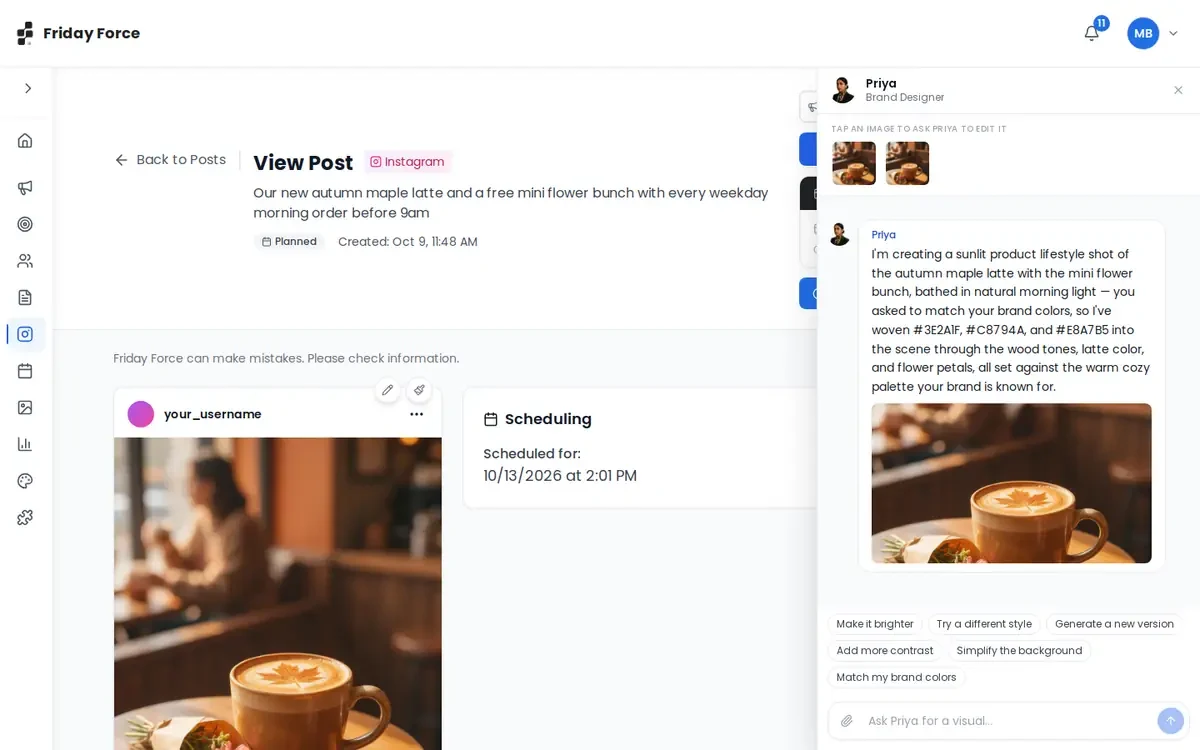
- Priya, Brand Designer: tap Make it brighter, Try a different style, Generate a new version, Add more contrast, Simplify the background or Match my brand colors, or describe your own idea. She explains her plan, then the new image replaces the old one. Every version stays at the top of her panel, so you can go back.
Each message to a specialist uses a small amount of credits, and an edited image costs the same as a new one. See what things cost.
Create a campaign
Part of Get started: Create your first campaign
A campaign is a full promotion, like a launch, a sale or an event. Covered in Get started: Create your first campaign. It walks through planning with Elena, checking the draft plan, creating the posts, and approving each one.
Write a post yourself
To write a post without AI, choose Manual Post, pick a platform and write your text under Post Content. Press Next to add media and schedule it like any other post.
Write a blog post
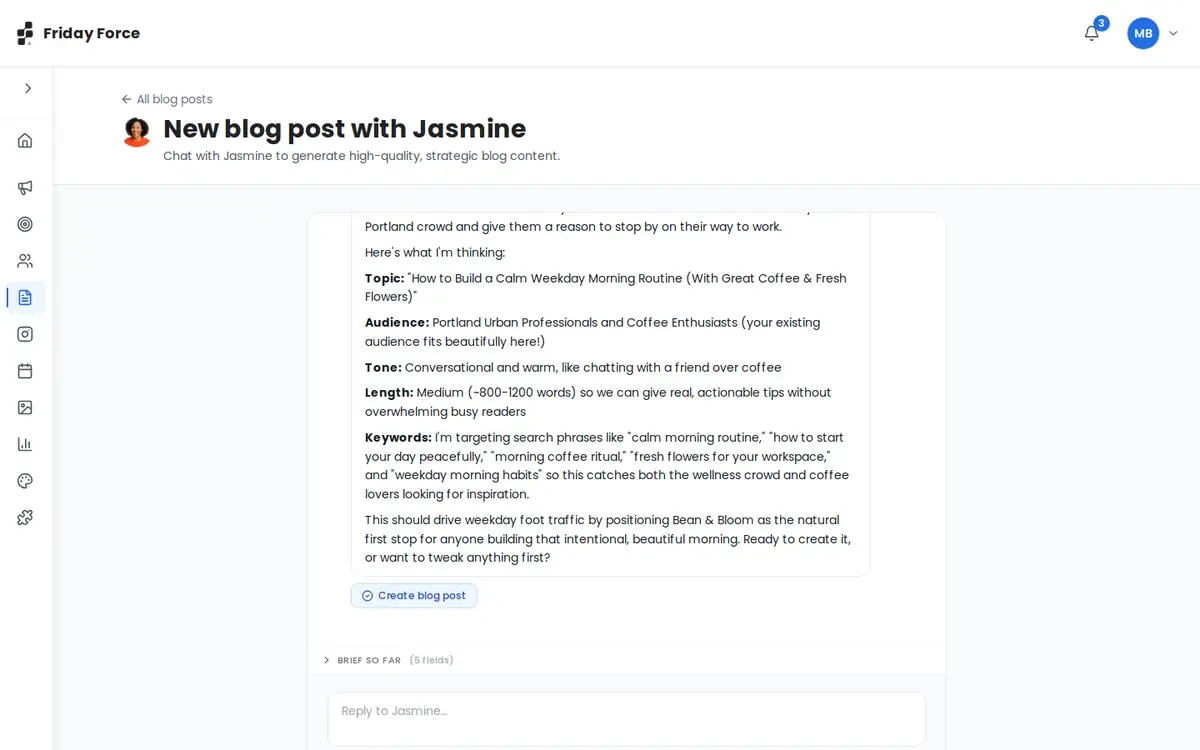
- Go to Blog Posts and press Create Post. Tell Jasmine your topic, or ask her for ideas. Attach briefs or research if you have them.
- Jasmine shows a plan: title, audience, tone, length and keywords. Reply to change anything.
- Press Create blog post. Jasmine writes it, and a cover image is made.
Check the facts in a blog
Blog posts are long, and AI can include facts, figures, quotes or sources that are wrong or made up. Before you publish:
- Every fact, number, date, price and claim about your business is right.
- Any statistic, study or source it mentions really exists. Remove it if you can’t confirm it.
- You’ve removed claims you can’t back up, especially about health, money or results.
- The SEO keywords are words your customers really search for.
- You’ve read the FAQ at the end. It’s easy to miss.
Edit and publish a blog
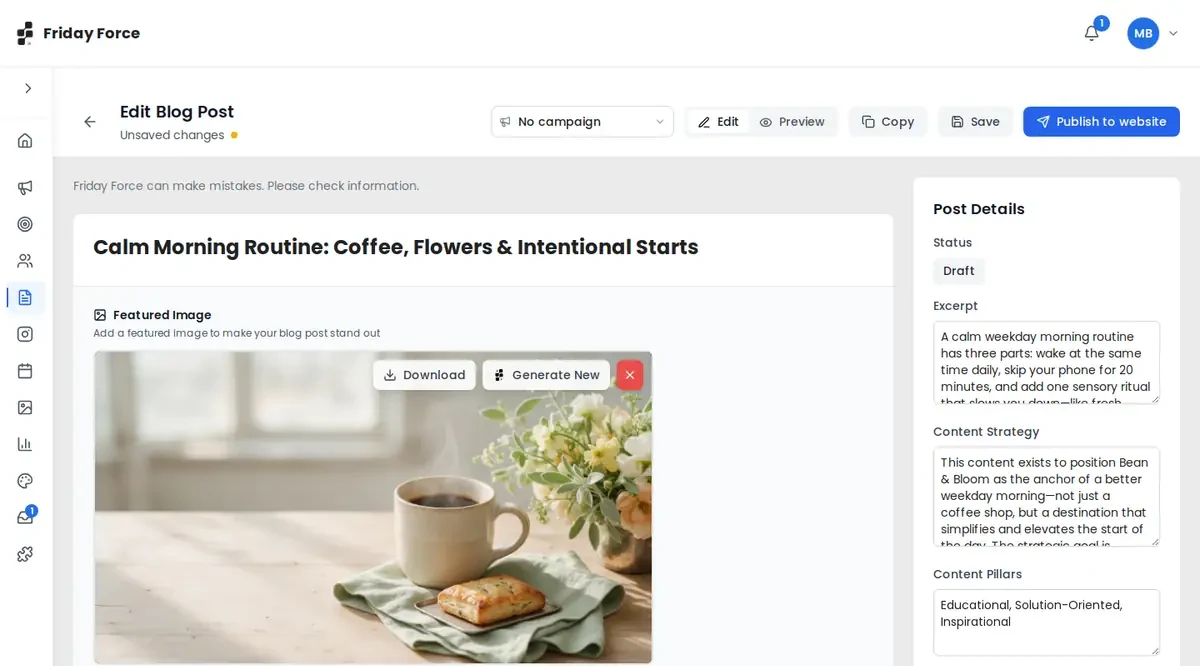
Open the post from Blog Posts. From there you can:
- Edit the text with the toolbar (bold, headings, lists, quotes, links and images), or chat with Jasmine to rewrite parts of it.
- Download the cover image, or press Generate New for a different one.
- Check the Post Details: excerpt, strategy, content pillars and SEO keywords.
- Press Preview, then Publish to website. Your website must be connected in Connections. Or press Copy and paste it into your website yourself.
Find your images and videos
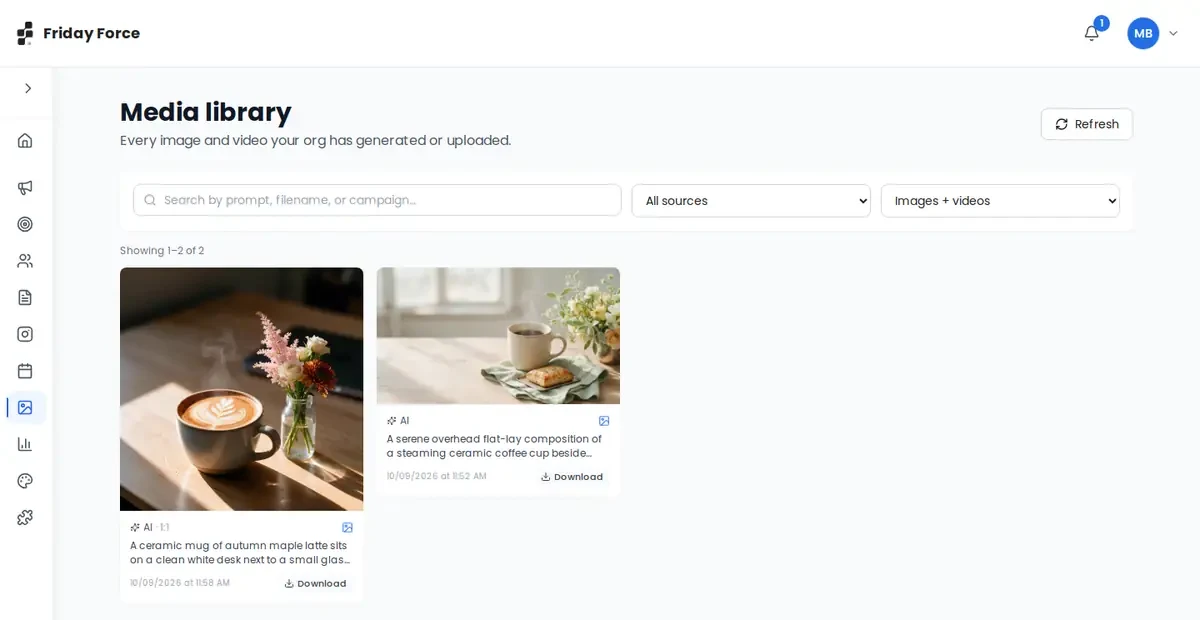
The Media Library holds every image and video your workspace has made or uploaded. You can filter by source (AI-generated or Uploaded) and by type.
3. Publishing and the calendar
Connect a channel, schedule or publish a post, see what each post status means, find every post on the Content Calendar, move or stop a scheduled post, post an Instagram Story, and reconnect a channel whose sign-in has expired.
Connect a channel
Part of Get started: Connect your channels and publish
- Go to Connections.
- Press Connect next to a channel and sign in to that platform. Use an account that has admin rights to the page or profile.
- Allow all the permissions it asks for. If you decline some, publishing or analytics may not work.
- Back in Friday Force, check that the channel shows as connected.
Anyone in your workspace can connect a channel. Only Owners and Admins can disconnect an account that someone else connected. Instagram needs a Business or Creator account. See what each channel needs.
Schedule a post
Part of Get started: Connect your channels and publish
- Open the post and press Plan Schedule.
- Pick a time. Smart Times shows a weekly map of good times to post on that platform, with ★ on the top 3. Or choose Custom Time. The calendar on the right shows what’s already scheduled, so posts don’t clash.
- Press Plan Schedule. The post is now Planned.
- Press Confirm Schedule. The post is now Scheduled and goes out automatically at that time. If your workspace uses approvals and you’re not an approver, you’ll see Submit for Review instead.
Smart Times starts with general patterns for your industry. Once you’ve published 30 or more posts, it learns from your own audience.
A Planned post is never sent until you press Confirm Schedule. To move, cancel or check a post later, see Move, cancel or delete a post.
Publish now
Part of Get started: Connect your channels and publish
To post straight away, open the post and press Publish. More options are under the arrow next to it. Run the Before you publish checklist first. If your workspace uses approvals and you’re not an approver, you can only schedule posts for review.
What each post status means
The status tells you whether a post will go out.
| Status | What it means | Will it go out? |
|---|---|---|
| Draft | Made, but no date | No |
| Generating | The team is still making it (campaign posts) | No |
| Planned | Has a date you haven’t confirmed | No, not until you press Confirm Schedule |
| Pending Approval | Waiting for an approver | No, not until it’s approved |
| Rejected | An approver turned it down, with a reason | No |
| Scheduled | Confirmed for a date and time | Yes, within a few minutes of that time |
| Publishing | Being sent right now | Yes |
| Published | Live on the platform | Already out |
| Partial | Went out on some platforms but not others | Partly. Fix it |
| Failed | It tried to go out, but didn’t | No. Fix it |
A Planned post will not be published until you press Confirm Schedule. If its date passes first, nothing happens: pick a new date, or the app says “Planned date is in the past. Please update the date before confirming.”
See everything on the Content Calendar
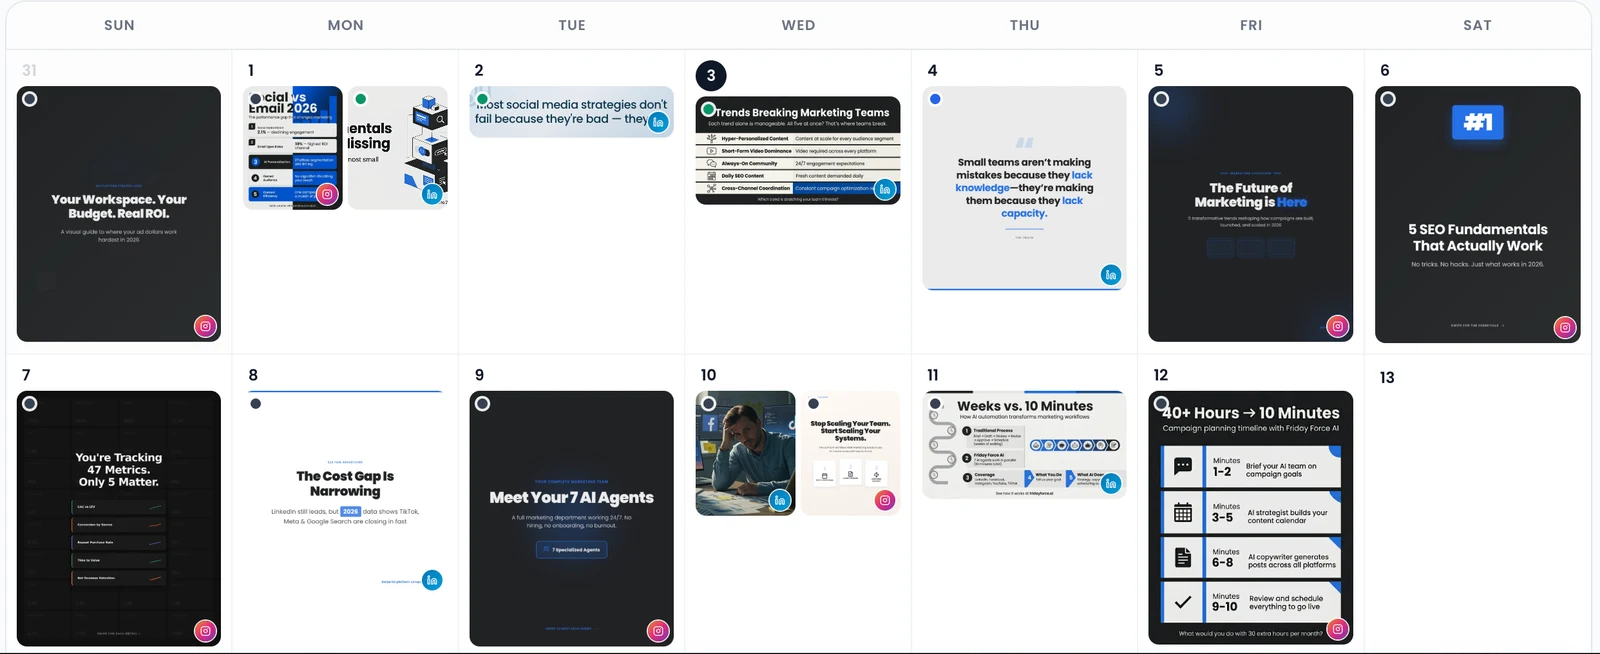
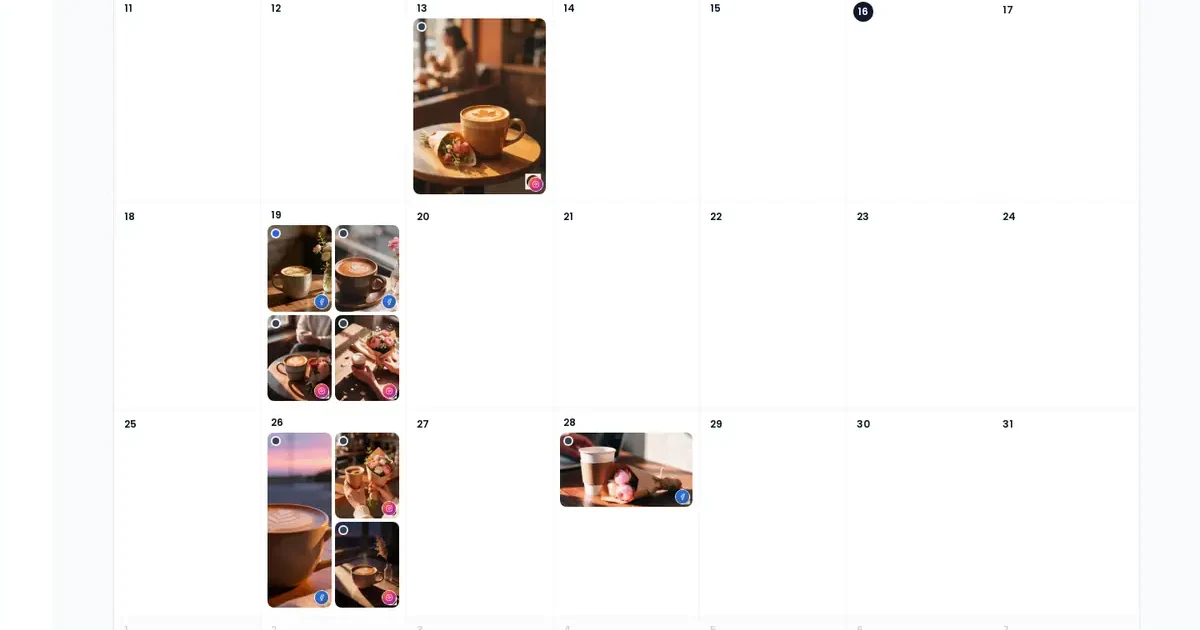
The Content Calendar shows your posts by date, with a picture of each. Switch between Mood Board, Timeline and Kanban views, filter by platform and status, and press Sync now to refresh.
Move, cancel or delete a post
- Move it: drag it to another day on the Content Calendar. A “Post rescheduled” message confirms it. This works for Draft, Planned, Scheduled and Failed posts. Or open a Planned post and press Edit Date.
- Stop a Scheduled post: open it and press Unschedule. It goes straight back to Draft, and you can plan it again.
- Delete it: you can delete drafts and scheduled posts. Published and Pending Approval posts can’t be deleted in Friday Force.
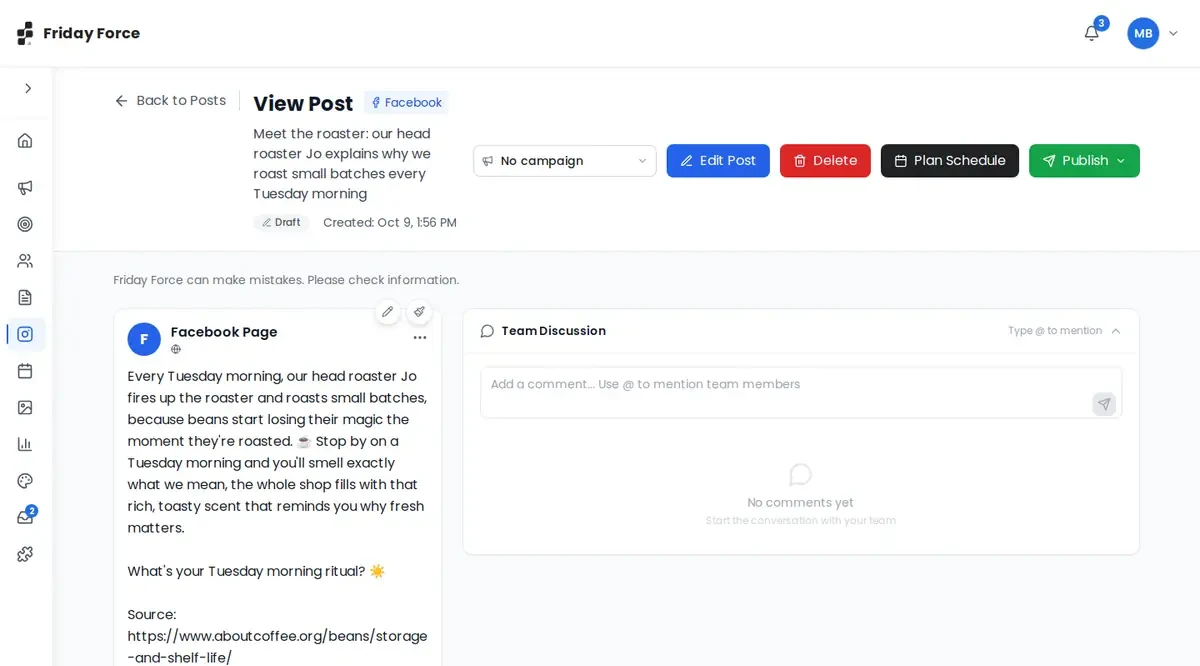
Deleting a post in Friday Force never removes it from the social platform. To take a published post down, delete it on Instagram, Facebook or the other platform itself.
Post an Instagram Story
You can create and publish Instagram Stories from Friday Force. Stories disappear after 24 hours, so they suit timely updates.
- Connect your Instagram account first. It must be an Instagram Business or Creator account. Go to Connections and allow access.
- Open the Social Media composer, choose Instagram as the platform and Story as the content type. A clock icon reminds you that Stories disappear after 24 hours.
- Upload an image or video. Use a vertical one, so it looks right on a phone.
- Publish it now, or schedule it. When you schedule, pick the date, time and timezone, and Friday Force posts it at that time.
- Check how it did. Story results (reach, impressions, replies, shares, exits and taps) are only available for 24 hours, while the Story is live.
What each channel needs
Part of Get started: Connect your channels and publish
Each platform has its own account rules.
| Channel | What you need |
|---|---|
| LinkedIn Personal | Your own LinkedIn profile |
| LinkedIn Business | A LinkedIn company page you’re an admin of |
| An Instagram Business or Creator account (not a personal account) | |
| Facebook Pages | A Facebook Page you manage |
| YouTube | Your YouTube channel |
| TikTok | Your TikTok account |
| Google Ads (Business and above · Beta) | A Google Ads account. Other plans see “Upgrade required”. |
| Website | Your website, so you can publish blog posts from Friday Force |
Anyone in your workspace can connect a channel. Only Owners and Admins can disconnect an account someone else connected.
Reconnect an expired channel
A connection can expire, for example when you change your password on that platform or it asks you to sign in again. Friday Force checks every day and tells you in three places:
- On Connections: the account turns red and shows “Connection expired - please reconnect”.
- When you create a post: “Publishing will fail for expired connections”, with the account listed.
- On a post that tried to go out: Failed, with “Token expired for platforms: … Please reconnect.”
To fix it, press Reconnect on Connections and sign in with the same account. Then reschedule any posts that failed.
4. Track results and improve
Your numbers appear once you connect a social account and publish posts. Friday Force collects results from each platform once a day, and Daniel turns them into findings you can act on.
When your numbers appear
Numbers appear after you connect a social account and publish posts. A new account shows 0.
- Friday Force collects your results from each platform once a day. Press Refresh now to pull the latest numbers sooner.
- Posts you publish directly on a platform are imported every 6 hours.
- An open Analytics page reloads every 5 minutes.
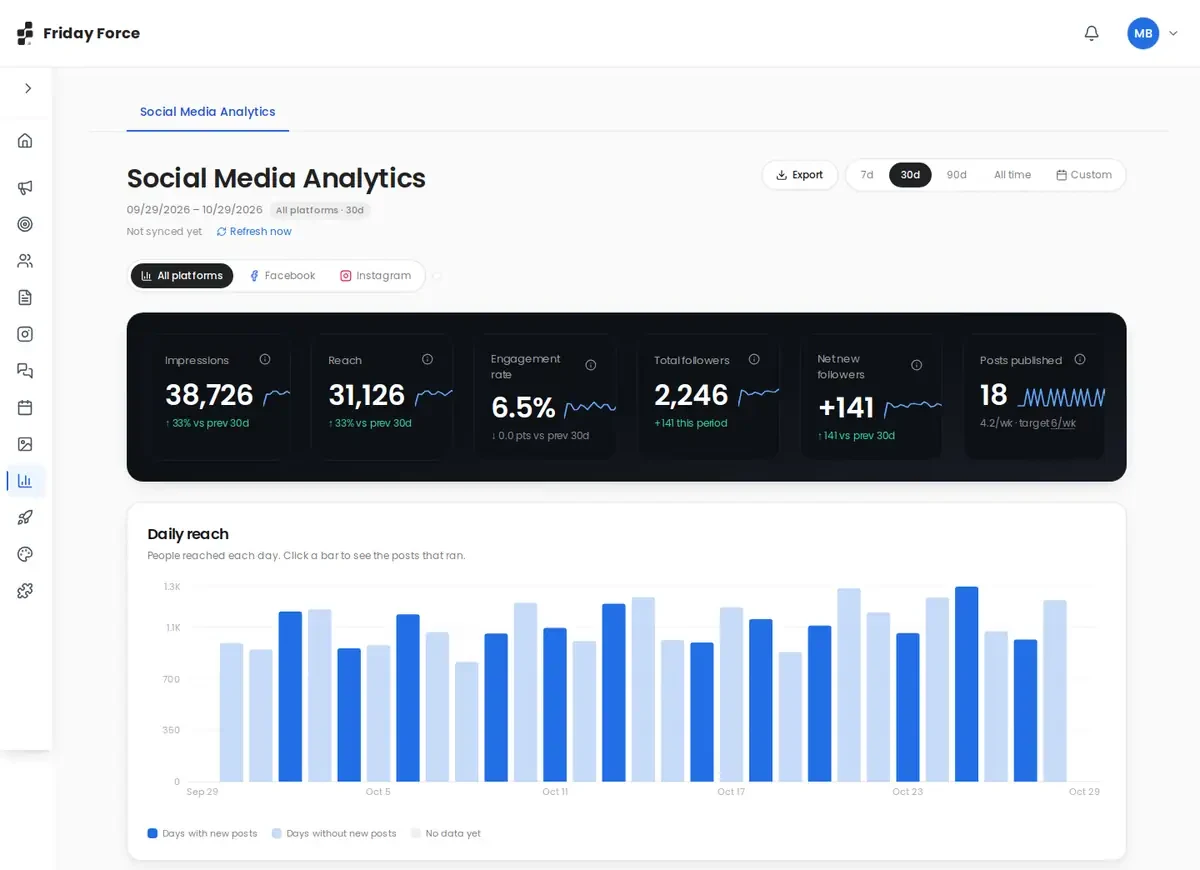
What the numbers mean
Choose a period (7 days to all time), a platform, or a single campaign.
| Number | What it tells you |
|---|---|
| Impressions | How many times your posts were shown, including repeat views |
| Reach | How many different people saw your posts |
| Engagement rate | Likes, comments, shares, saves and reactions, divided by reach, as a percentage. If reach isn’t available, followers are used instead. |
| Total followers | Followers across your connected accounts |
| Net new followers | Followers gained minus followers lost in the period |
| Posts published | Compared with the weekly target from your strategy |
Below the numbers are charts for daily reach (click a day to see its posts), engagement over time, results by platform, and your top 5 posts.
Which channels report results
| Channel | What you get |
|---|---|
| Reactions, comments, shares, reach, impressions and page followers | |
| Likes, comments, shares, saves, reach and followers | |
| TikTok | Likes, comments, shares, views and followers (no separate reach) |
| LinkedIn company page | Likes, comments, shares, reach, impressions and followers |
| LinkedIn personal profile | Limited: most numbers aren’t available |
| YouTube | Likes, comments, views and subscribers |
Blog posts published to your website don’t appear in Social Media Analytics.
Turn results into your next campaign
Part of Get started: Check your results and improve
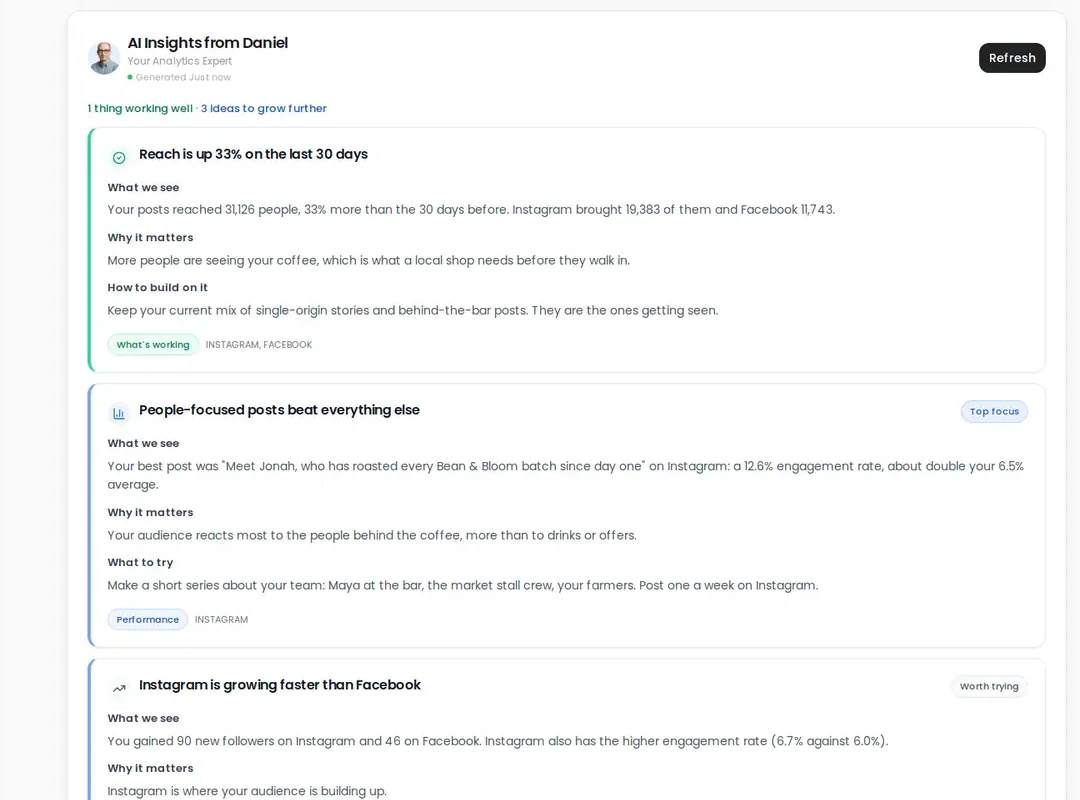
- Press Ask Daniel for AI Insights. Daniel turns the numbers into findings: what’s working, why it matters, and what to try next.
- Pick one or two findings to act on. For example: “Carousels reached twice as many people as single images.”
- Open your next campaign’s chat. Elena automatically reads Daniel’s latest insights, so you can ask: “Based on Daniel’s insights, what should we change?” Or ask Omar to update your strategy.
5. Plans and credits
Credits pay for the AI work: posts, images, videos, blogs, strategies and research. One credit is one cent. Your plan gives you credits every month, and you can top up any time.
How credits work
Credits pay for the AI work: posts, images, videos, blogs, strategies and research. 1 credit = 1 cent.
| Plan | Credits per month |
|---|---|
| Pro | 2,000 |
| Pro 5x | 10,000 |
| Business | 25,000, one pool shared by the whole team |
- Plan credits reset when your plan renews. Unused plan credits don’t carry over. Annual plans get all 12 months up front: an annual Pro plan starts the year with 24,000.
- Top-ups: 1,000 credits for $10, 2,500 for $25, 5,000 for $50 or 10,000 for $100. They never expire, and they’re used only after your plan credits run out.
- Your balance is on the AI Credits card under Billing. A banner appears at the top of the app when you’re low.
- At zero, new AI work pauses until your plan renews or you add credits. Everything you’ve already made stays, and you can still edit, schedule and publish it.
- Only Owners and Admins can buy credits or change the plan.
Plan prices are on the pricing page.
What things cost
| Action | Typical credits |
|---|---|
| A social post (caption) | About 20, up to 50 |
| An image (new or edited) | 80 |
| A blog post | About 65, up to 160 |
| A chat message to a specialist | About 35, up to 150 |
| Execute Strategy (creates a draft campaign) | Free, but counts toward your monthly campaign limit |
| Editing anything by hand | Free |
The exact cost depends on the work. These are typical amounts.
Give a full brief the first time, review Elena’s and Jasmine’s plans before work is made, and change only what’s wrong. Small fixes are cheapest done by hand.
Billing
To manage your plan and payments, open Billing from your initials (top right). You’ll find your current plan and renewal date, the AI Credits card, Change Plan, Payment Methods and Billing History.
Only Owners and Admins can manage billing. Everyone else sees “Only organization owners and admins can manage billing.”
6. Team, approvals and your accountBusiness and above
On the Business plan you can invite your team, give each person a role, talk about posts next to the post, and have an approver sign off before posts go out. Your own account details are always in My Account.
Invite your teamBusiness and above
To add someone, go to Organization → Team Management and press Invite members. Enter their email and choose a role. They get an email with a link to join. You can change a role or remove someone at any time.
What extra users cost is on the pricing page. Extra users don’t add credits: the whole team shares one pool of 25,000 credits a month.
| Role | What they can do |
|---|---|
| Member | Create content, connect channels, schedule and publish (unless your workspace uses approvals) |
| Admin | Everything a Member can, plus manage members, settings, billing and credits, and disconnect anyone’s channels |
| Owner | Everything an Admin can. Owners are approvers by default, and can delete the workspace. |
| Client | Can’t publish or schedule |
Getting posts approvedBusiness and above
Part of Get started: Create your first campaign
If your workspace uses approvals, only approvers can publish directly. Everyone else sends posts for review, and an approver decides.
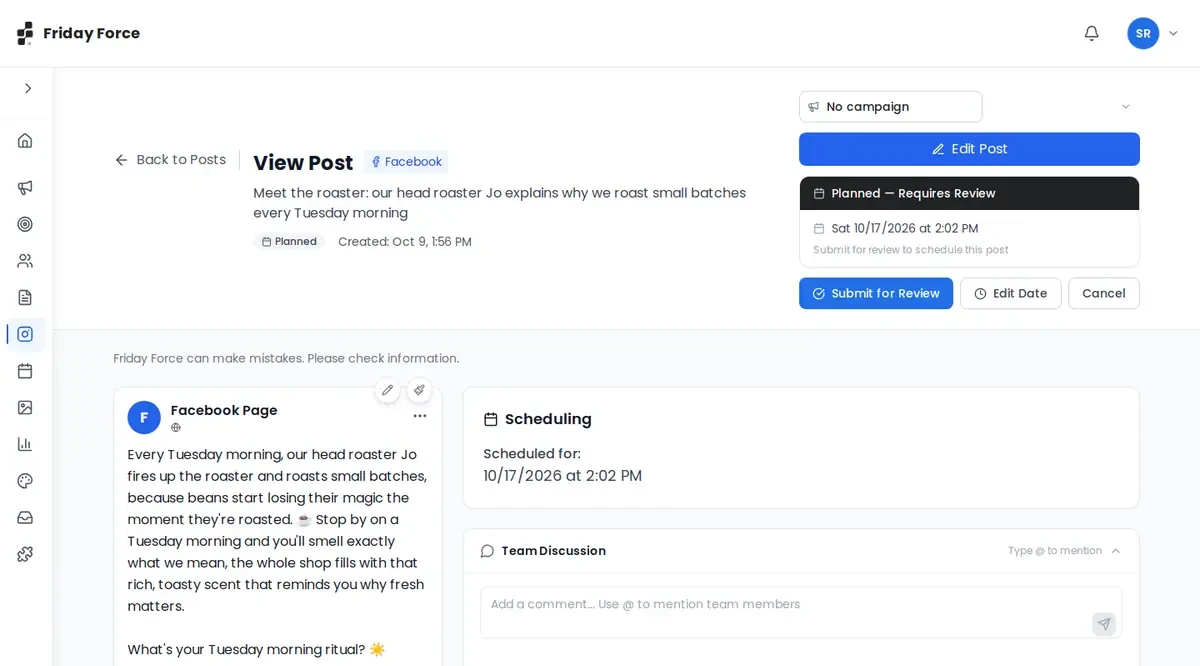
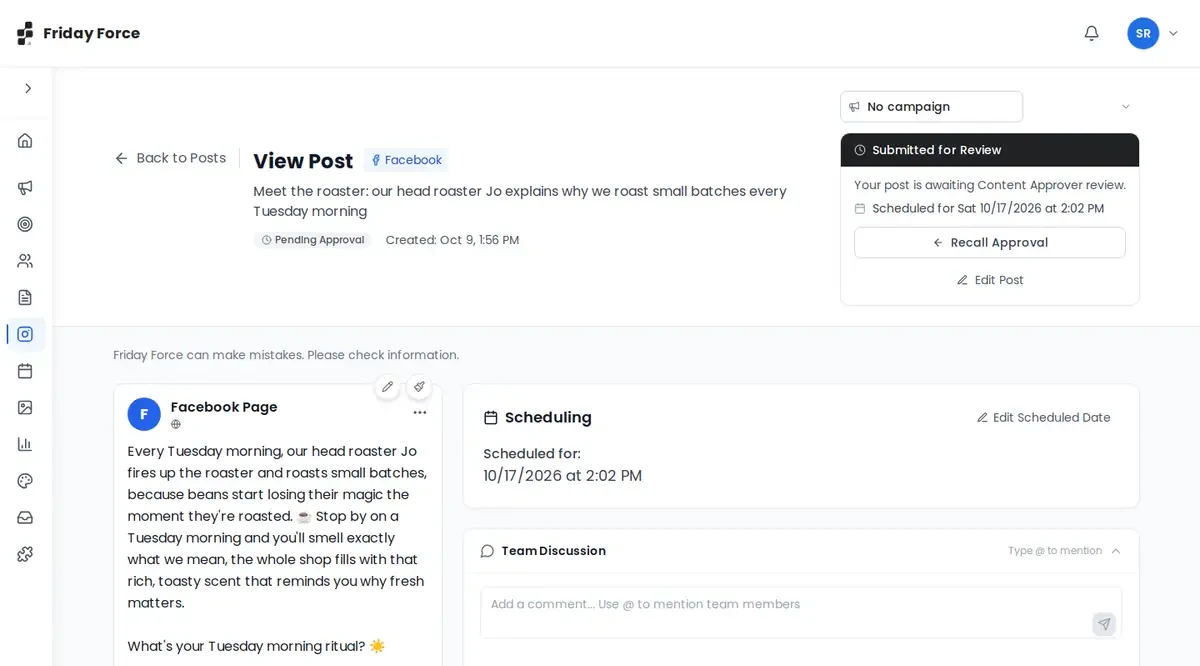
- Submit: plan the post as usual. Instead of Confirm Schedule you’ll see Planned — Requires Review. Press Submit for Review.
- Wait: the post becomes Pending Approval, with the message “Your post is awaiting Content Approver review.” To take it back, press Recall Approval.
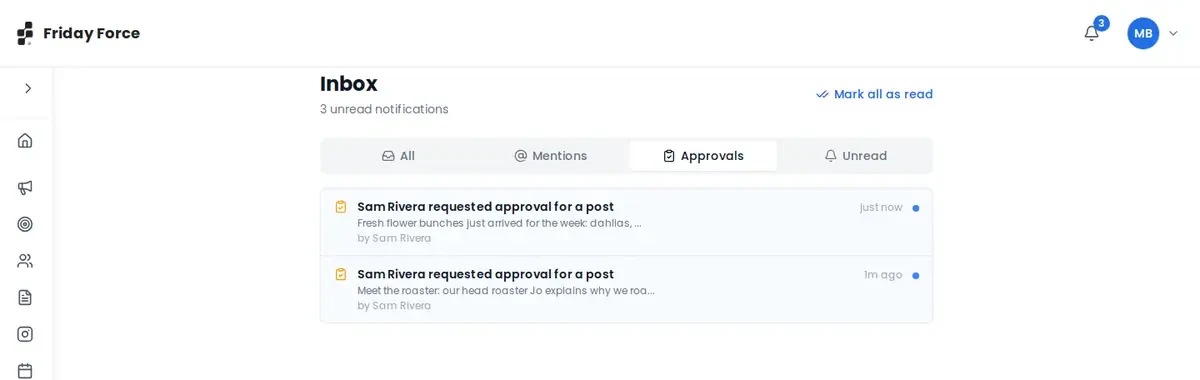
- The approver is notified in Inbox → Approvals.
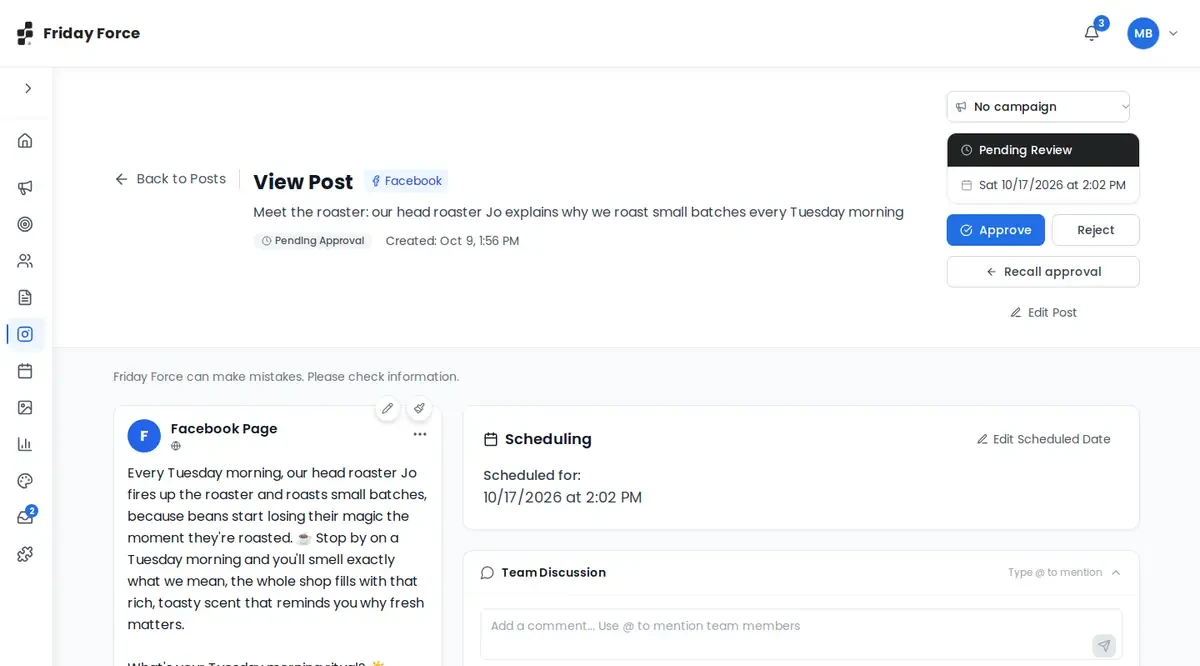
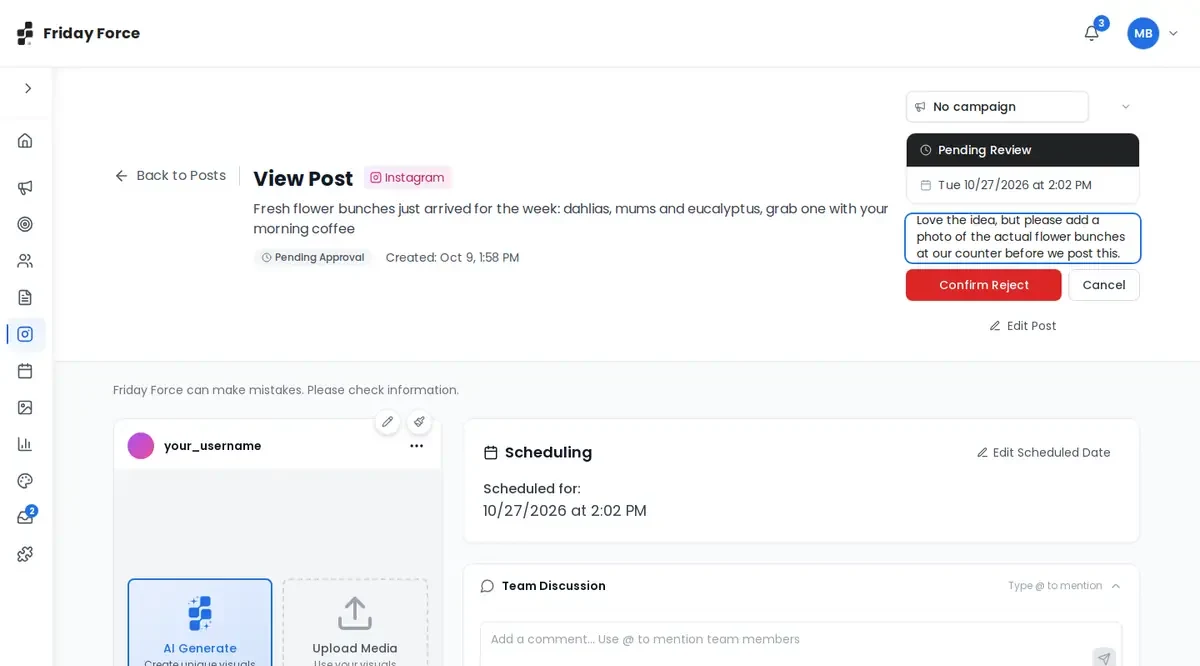
- The approver decides: they open the post (Pending Review) and press Approve, Reject or Edit Scheduled Date. Approved posts become Scheduled for their date. To reject, they write a reason and press Confirm Reject.
- If it’s rejected, the post becomes Rejected and shows Rejection Feedback: the reason and who reviewed it. Edit the post and press Resubmit.
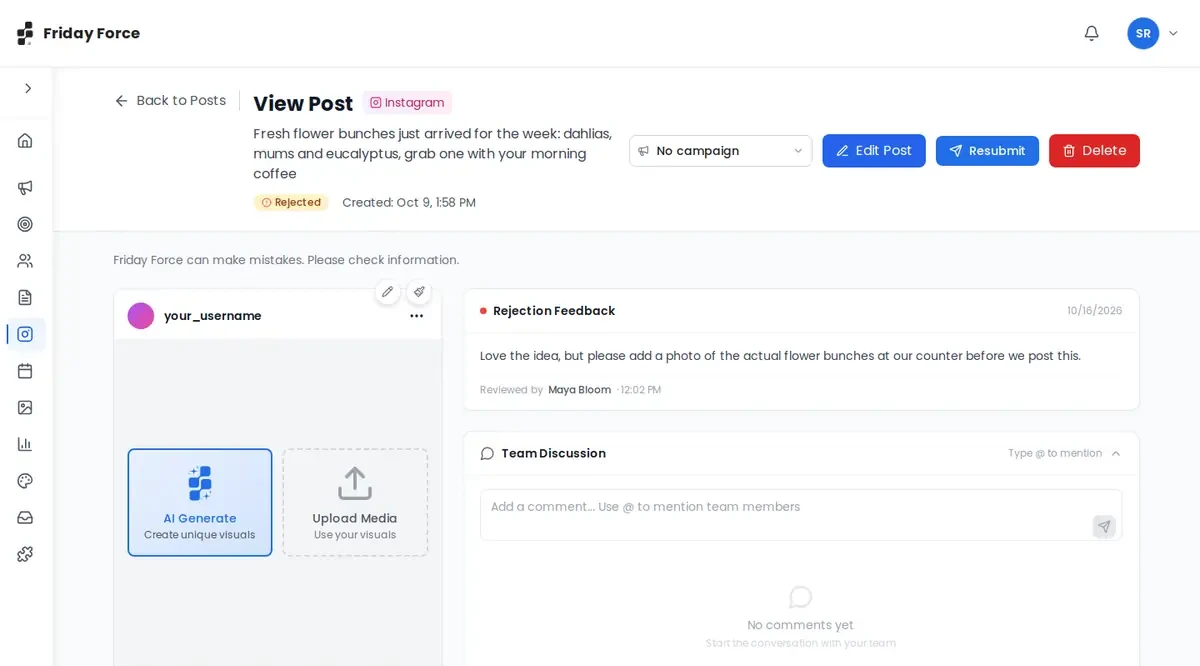
Who is an approver? Owners, by default, plus anyone given the Content Approver permission in Team Management. It’s a setting for each person, not a role. If the post’s time has already passed when it’s approved, Friday Force asks whether to publish it now or pick a new date.
Discuss posts with your teamBusiness and above
Next to each post, your team can comment in Team Discussion. Type @ to mention a colleague. Everything that needs you (mentions, replies and approval requests) appears in your Inbox. Click an item to go to the post.
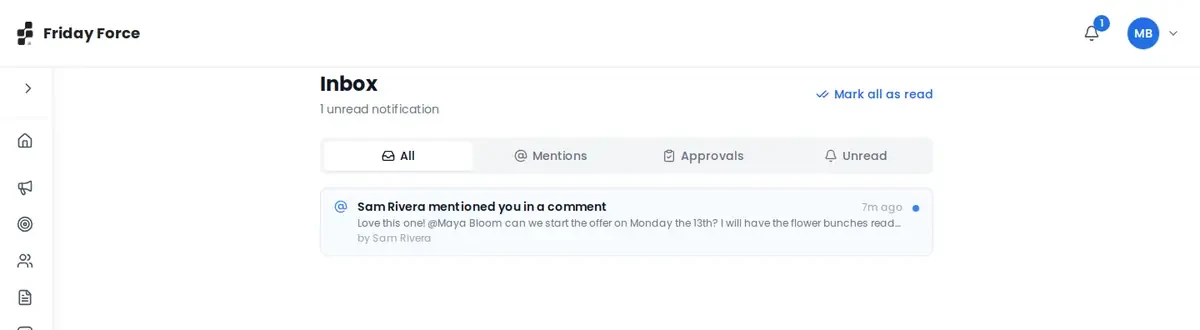
Your account
To change your name, photo, email or password, open My Account from your initials. It also lists every workspace you belong to. Owners can delete a workspace there without deleting their own account.
7. More tools
Some tools come with higher plans: ads, comment and message replies, the Inbox and team management. This page says what each one does and how to start.
Tools on some plans
| Tool | Plan | What it does |
|---|---|---|
| Google Ads | Business and above · Beta | Paid search ads, planned with Elena. |
| Meta ads | Business and above | Boost Facebook and Instagram posts and manage them in Ads Manager. |
| Community Management | Business and above | Reply to Facebook and Instagram comments and messages. |
| Inbox | Business and above | Mentions, replies and approval requests from your team, in one place. |
| Team Management | Business and above | Team members with roles and approvals. |
| Media Library | All plans | Every AI-made image and video. |
Paid ads with ElenaBusiness and above
- Connect Google Ads. On Connections (or from the card Elena shows in the campaign chat), sign in to Google and pick your ad account.
- Plan the ad with Elena. In the campaign chat she asks for your daily budget, countries, target cost per conversion (CPA) and keywords. The team drafts the ad copy, keywords and images.
- Check and launch. Review everything, then launch. Bidding is set to get conversions.
- Adjust by chatting with Elena. After launch you can change the daily budget, pause or restart the ad, or add a keyword to avoid (a “negative keyword”).
Ad copy, keywords, location and language can’t be changed after launch. To change them, pause the ad and make a new version.
Meta ads: you can also boost Facebook and Instagram posts and manage them in Ads Manager. Connect your Meta account first. Until you do, Ads Manager shows “Connect Meta Ads to boost posts”.
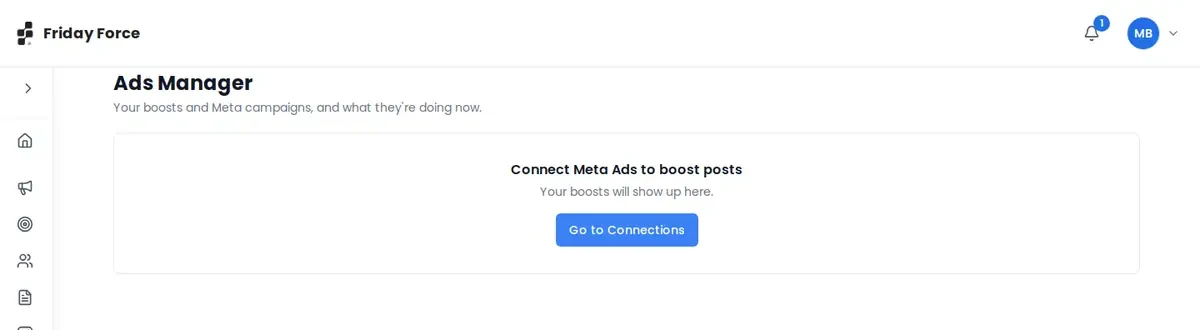
Community ManagementBusiness and above
Community Management puts your customers’ Facebook and Instagram comments and direct messages in one list. Connect a Facebook Page or Instagram account first.
- Reply to comments and messages, with Luis’s help. You can hide or delete comments, or reply to a commenter privately by DM.
- Work as a team: assign a conversation to a teammate (they’re notified), add internal notes with @mentions, or mark it unread.
- Automate replies on a post: choose trigger words (or every comment), and Luis drafts the reply. Turn each rule on or off.
- Meta only lets you answer a direct message within 24 hours of the customer’s last message. The page shows this window.
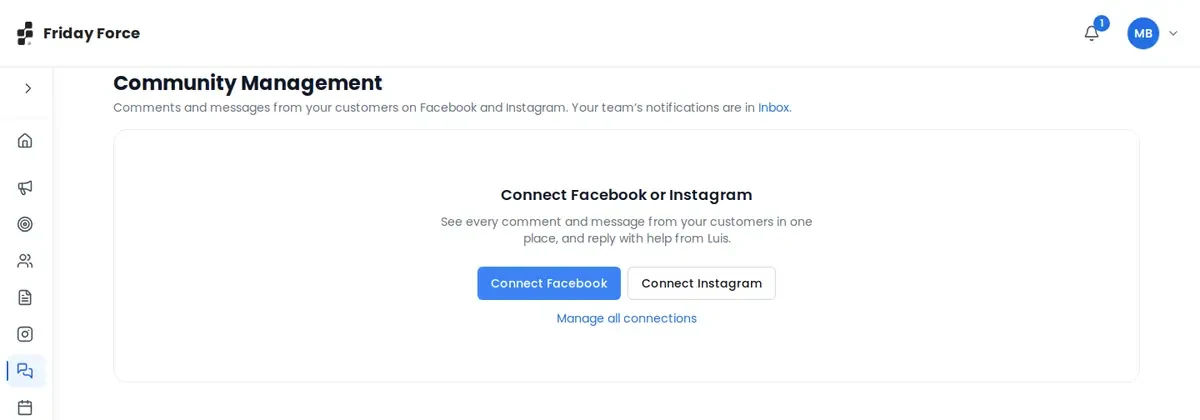
8. Fix a problem
Most problems have a quick fix: check the bell, reload, fix only the part that is wrong, and reconnect a channel if its sign-in expired. If you’re still stuck, send support a screenshot.
Understand what the team is doing
All AI work (posts, images, blogs, campaigns, research) runs on our servers, so you can leave the page while it works. Click the bell to see where it is:
| In the bell | What it means | What to do |
|---|---|---|
| Queued | Under Active Workflows: waiting for another job to finish | Wait. Don’t start the same task again. |
| In Progress | Under Active Workflows, with a progress bar | Wait. Check back any time. |
| Completed | Under Recent Activity: “Your … has been completed successfully.” | Open it and review it |
| Failed | “Your … encountered an error and failed to complete.” | Try once more. If it fails again, contact support. |
Don’t press Generate again for the same post or blog, and don’t delete the item. That can create duplicates and use extra credits. (Pressing Execute again on a campaign is safe. See A campaign stopped partway.)
Common problems
A task seems stuck
You see: the progress bar hasn’t moved for a long time, or the work never shows up.
- Open the bell. Is it still under Active Workflows? If it says Queued, it’s waiting for another job.
- Reload the page and check the bell again.
- Look for the result where it would appear: Social Media, Blog Posts or the campaign.
- After about 30 minutes, stuck work disappears from the bell, and stuck images or videos are marked Failed. Then try again.
- Still stuck? Take a screenshot of the bell and contact support.
A post is missing its caption or image
- No image: in the image area, choose AI Generate again or Upload Media.
- No caption, or a short one: press Edit Post and write it, or press Consult your team.
- Don’t delete and recreate the whole post. Fix just the missing part.
The image is wrong, off-brand, or shows things that don’t exist
- Don’t publish it.
- Choose AI Generate → You have a visual in mind? and describe exactly what to show, and what not to show.
- Or choose Upload Media and use your own photo.
- If it keeps happening, check your Brand Kit colours and guidelines and add real reference images.
The company or audience research is wrong
- Company details: press Edit Organization, or tell Elena what’s wrong.
- Audience: open it and press Edit, or ask Omar to research it again with the right details.
- Upload documents that describe your business correctly, so the team has a reliable source.
- Then check any campaigns already made from the wrong information.
A campaign stopped partway
You see: fewer posts than planned, or posts without images or captions.
- Check the bell. If work is still under Active Workflows, wait.
- When nothing is running, press Execute again. The team only finishes empty or unfinished posts. It skips the rest and doesn’t charge twice.
- To fix just one post, open Review posts and press Regenerate copy or Regenerate visual.
- Still missing posts? Contact support with the campaign name.
I’m out of credits
You see: a banner at the top of the app, and new AI work won’t start.
- Everything you’ve already made is safe. You can still edit, schedule and publish it.
- An Owner or Admin can add a top-up on Billing → AI Credits, or upgrade the plan. Otherwise, wait until your plan renews.
A post failed or only partly published
You see: the post shows Failed, or Partial if it went out on some platforms but not others.
- If the message says “Token expired… Please reconnect”, go to Connections and reconnect the channel.
- Check the post follows the platform’s rules, for example image size, video length or caption length.
- Drag the post to a new time on the Content Calendar, or publish it again.
- Fails again? Contact support with the post and channel.
My social account disconnected
You see: on Connections, the account turns red and shows “Connection expired - please reconnect”.
- Press Reconnect.
- Sign in with the same account, one that has admin rights, and allow every permission.
- Check any posts that were scheduled while it was disconnected, and reschedule the ones that failed.
I can’t delete or reschedule a post
- Planned post with a past date: pick a new date first, then confirm it.
- Scheduled post: drag it on the Content Calendar, or press Unschedule to move it back to Draft.
- Published or Pending Approval post: these can’t be deleted in Friday Force. To remove a published post, delete it on the platform itself.
- Something else? Contact support with the post’s name and status.
My blog won’t publish to my website
- Check your website is connected in Connections.
- In the meantime, press Copy on the blog and paste it into your website yourself. Download the cover image to go with it.
- Still stuck? Contact support and tell us which website platform you use.
My analytics are empty
Results appear only after you connect a social account and publish posts. Friday Force collects results from each platform once a day, and Refresh now gets them sooner.
Get help
Email support@forcivate.com or use the support page. To help us fix it quickly, include:
- Your organization (workspace) name
- Your browser and device
- What you were trying to do
- What happened instead
- A screenshot
- About when it happened, with your time zone
Before you retry something that failed, take a screenshot. It helps us see what went wrong.
Screens were captured in October 2026 and may differ slightly from the current app. They show a made-up business, Bean & Bloom Coffee.